A new Custom CSS & JS item appears in your left sidebar.
Step 2: Add your code
Click Add Custom CSS (or Add Custom JS / Add Custom HTML). Give it a descriptive title — future you will thank present you — then write your code in the editor. Delete the sample code first and start fresh.
Click Add Custom CSS (or Add Custom JS / Add Custom HTML). Give it a descriptive title — future you will thank present you — then write your code in the editor. Delete the sample code first and start fresh.
On the right side you’ll see the key settings (free version):
- Linking type — External File saves your code as a real file on your server; Internal embeds it dynamically via the WordPress API.
- Linking type — External File saves your code as a real file on your server; Internal embeds it dynamically via the WordPress API.
- Where on page — choose whether the code loads in the
<head>or the<footer>. Scripts that don’t need to run immediately usually belong in the footer for better performance. - Where on page — choose whether the code loads in the
<head>or the<footer>. Scripts that don’t need to run immediately usually belong in the footer for better performance. - Where on site — Frontend for your public site, Admin for the dashboard, or Login Page for customizing the login screen.
- Where on site — Frontend for your public site, Admin for the dashboard, or Login Page for customizing the login screen.
Click Publish when you’re done.
Step 3: Clear your cache
If your site uses a caching plugin or your host has server-side caching, clear it now — otherwise visitors may keep seeing the old version of your site.
If your site uses a caching plugin or your host has server-side caching, clear it now — otherwise visitors may keep seeing the old version of your site.
A note on the alternatives
- Customizer → Additional CSS works fine for small CSS tweaks, but it only handles CSS and offers no organization for larger changes.
- Customizer → Additional CSS works fine for small CSS tweaks, but it only handles CSS and offers no organization for larger changes.
- A child theme is the best home for code that’s part of your site’s design and should survive theme switches conceptually — see our child theme tutorial.
- A child theme is the best home for code that’s part of your site’s design and should survive theme switches conceptually — see our child theme tutorial.
- For code that does things (rather than just styling), consider packaging it as a small plugin — our plugin development basics guide walks through it.
- For code that does things (rather than just styling), consider packaging it as a small plugin — our plugin development basics guide walks through it.
Whichever method you choose, keep custom code organized and documented. Six months from now, a snippet titled “test final v2” helps no one.
Whichever method you choose, keep custom code organized and documented. Six months from now, a snippet titled “test final v2” helps no one.
Custom CSS and JavaScript let you change how your WordPress site looks and behaves — tweaking colors and fonts, adding tracking scripts, or building small interactive features. WordPress offers several ways to add custom code: a plugin (easiest), the Customizer (CSS only), or a child theme with enqueued files (most robust).
This tutorial covers the easy way: the free Simple Custom CSS and JS plugin (400,000+ active installs). It adds a code editor right inside your dashboard, so you never have to touch theme files.
Step 1: Install the plugin
- In your WordPress dashboard, go to Plugins → Add New.
- Search for “Simple Custom CSS and JS”.
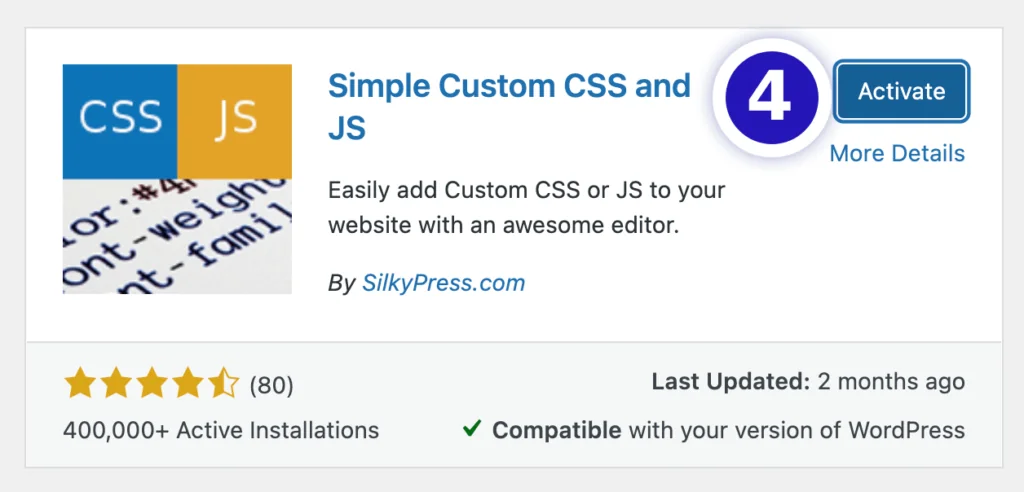
- Click Install Now, then Activate.
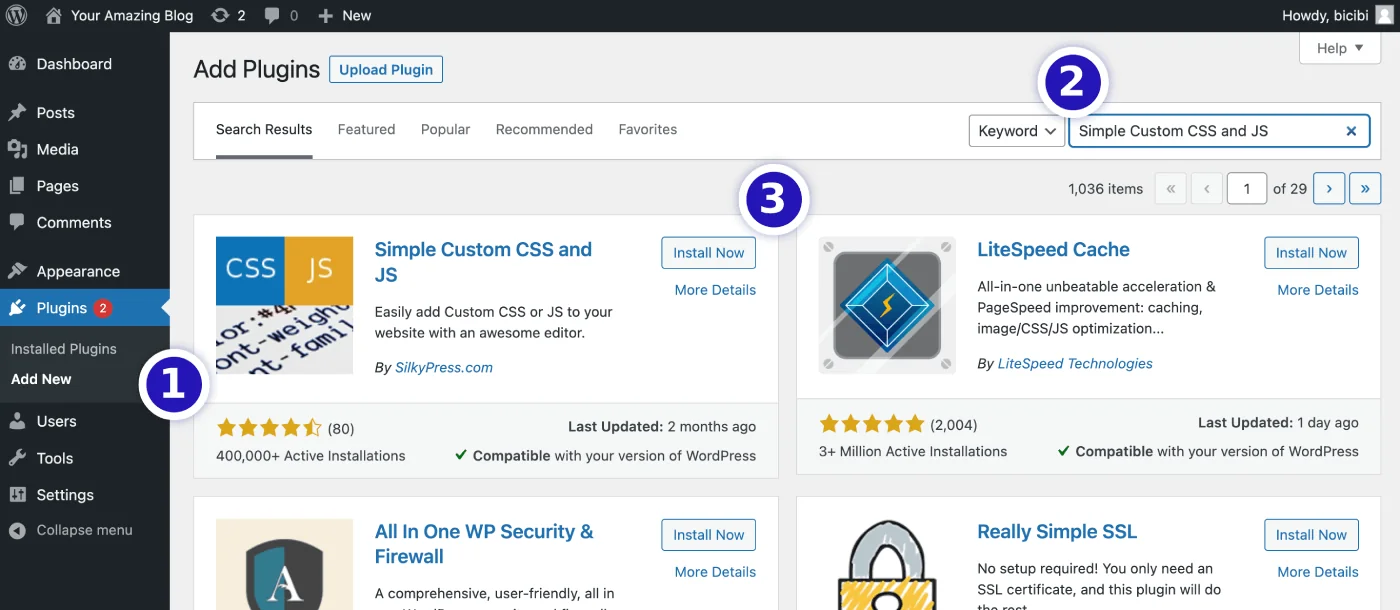
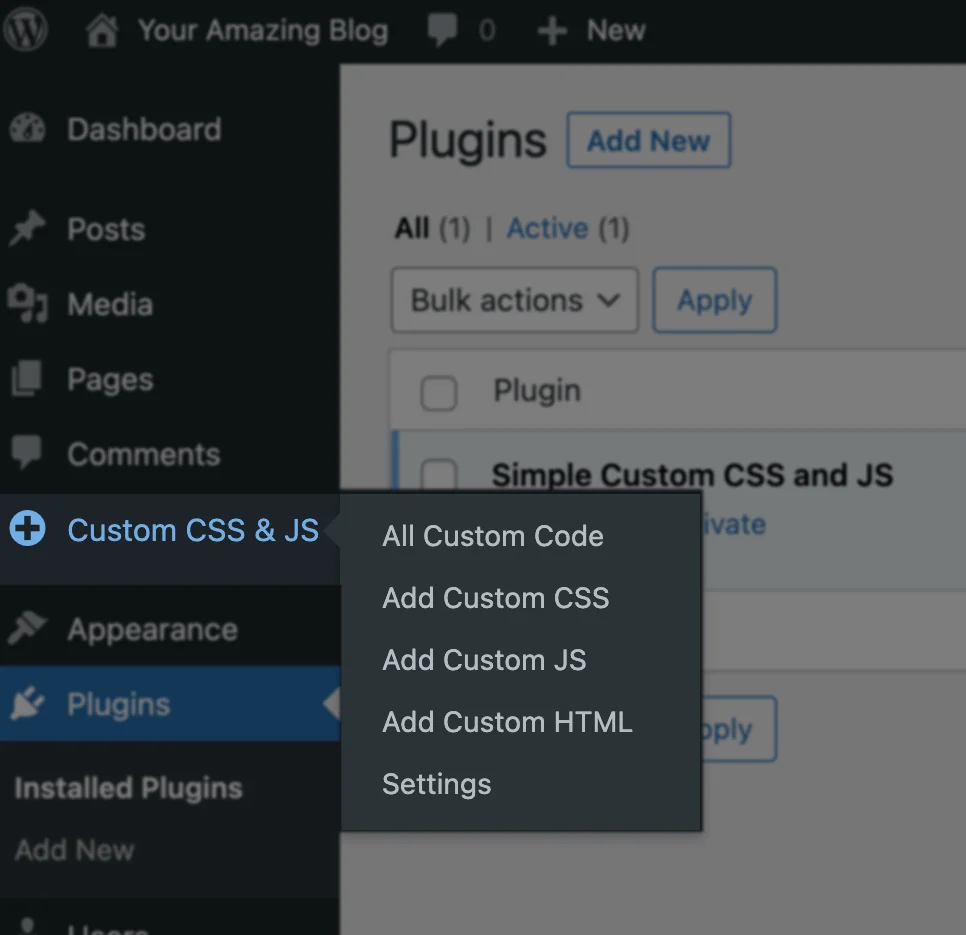
A new Custom CSS & JS item appears in your left sidebar.
Step 2: Add your code
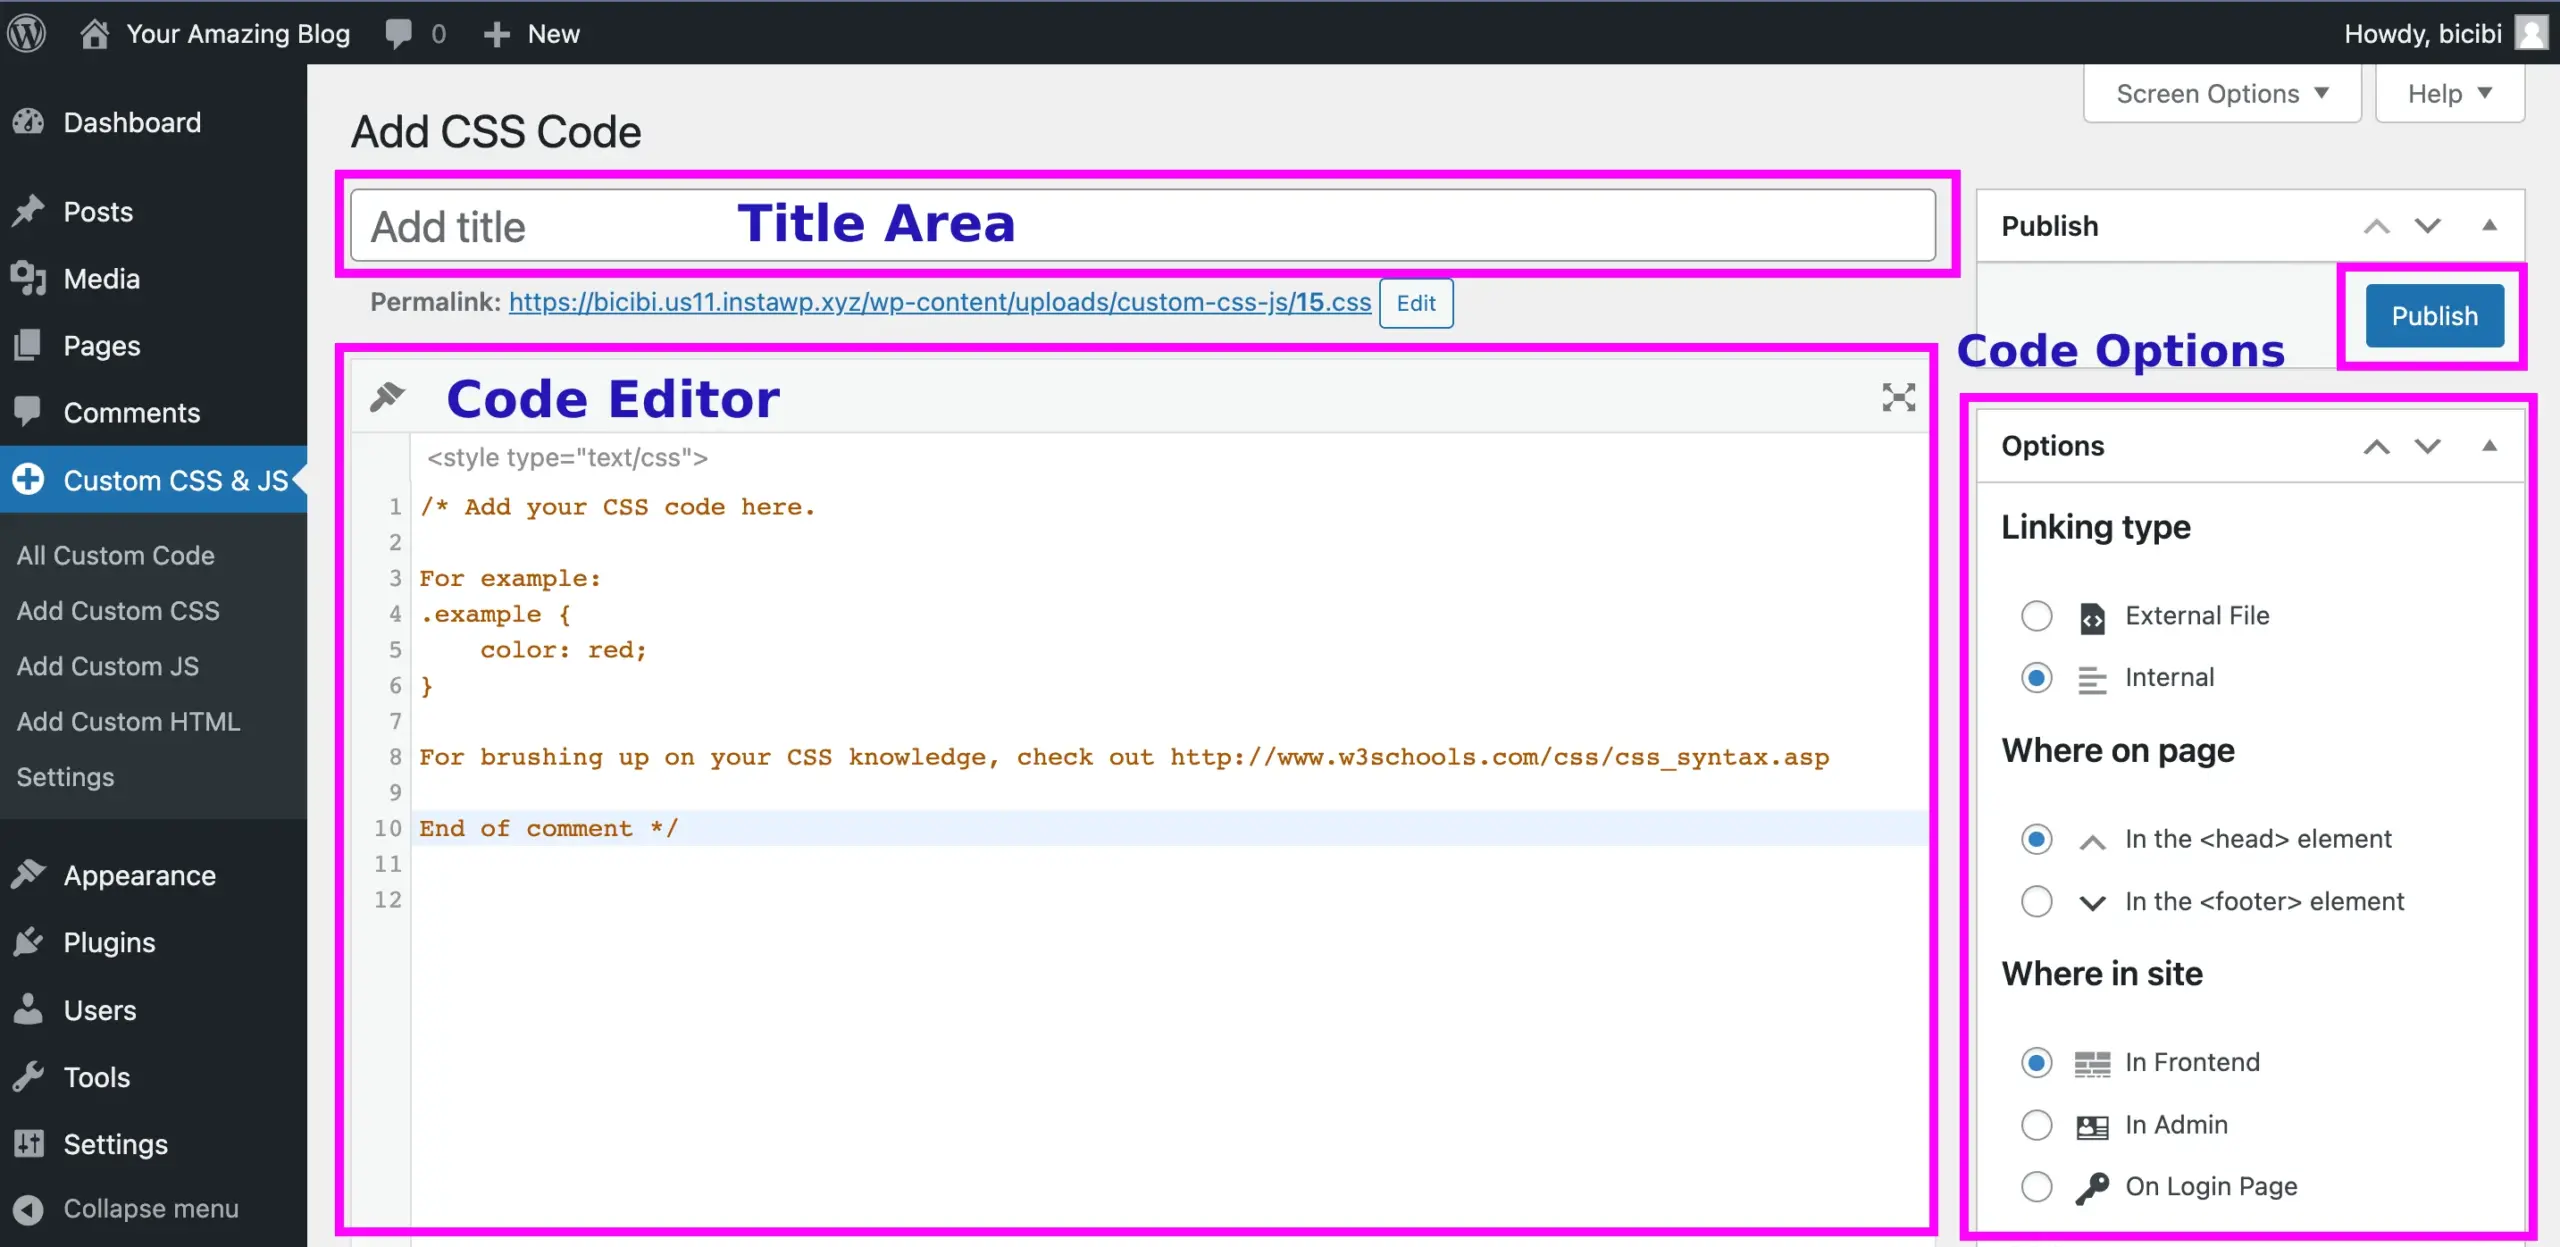
Click Add Custom CSS (or Add Custom JS / Add Custom HTML). Give it a descriptive title — future you will thank present you — then write your code in the editor. Delete the sample code first and start fresh.
On the right side you’ll see the key settings (free version):
- Linking type — External File saves your code as a real file on your server; Internal embeds it dynamically via the WordPress API.
- Where on page — choose whether the code loads in the
<head>or the<footer>. Scripts that don’t need to run immediately usually belong in the footer for better performance. - Where on site — Frontend for your public site, Admin for the dashboard, or Login Page for customizing the login screen.
Click Publish when you’re done.
Step 3: Clear your cache
If your site uses a caching plugin or your host has server-side caching, clear it now — otherwise visitors may keep seeing the old version of your site.
A note on the alternatives
- Customizer → Additional CSS works fine for small CSS tweaks, but it only handles CSS and offers no organization for larger changes.
- A child theme is the best home for code that’s part of your site’s design and should survive theme switches conceptually — see our child theme tutorial.
- For code that does things (rather than just styling), consider packaging it as a small plugin — our plugin development basics guide walks through it.
Whichever method you choose, keep custom code organized and documented. Six months from now, a snippet titled “test final v2” helps no one.
Custom CSS and JavaScript let you change how your WordPress site looks and behaves — tweaking colors and fonts, adding tracking scripts, or building small interactive features. WordPress offers several ways to add custom code: a plugin (easiest), the Customizer (CSS only), or a child theme with enqueued files (most robust).
Custom CSS and JavaScript let you change how your WordPress site looks and behaves — tweaking colors and fonts, adding tracking scripts, or building small interactive features. WordPress offers several ways to add custom code: a plugin (easiest), the Customizer (CSS only), or a child theme with enqueued files (most robust).
This tutorial covers the easy way: the free Simple Custom CSS and JS plugin (400,000+ active installs). It adds a code editor right inside your dashboard, so you never have to touch theme files.
This tutorial covers the easy way: the free Simple Custom CSS and JS plugin (400,000+ active installs). It adds a code editor right inside your dashboard, so you never have to touch theme files.
Step 1: Install the plugin
- In your WordPress dashboard, go to Plugins → Add New.
- Search for “Simple Custom CSS and JS”.
- Click Install Now, then Activate.
A new Custom CSS & JS item appears in your left sidebar.
Step 2: Add your code
Click Add Custom CSS (or Add Custom JS / Add Custom HTML). Give it a descriptive title — future you will thank present you — then write your code in the editor. Delete the sample code first and start fresh.
Click Add Custom CSS (or Add Custom JS / Add Custom HTML). Give it a descriptive title — future you will thank present you — then write your code in the editor. Delete the sample code first and start fresh.
On the right side you’ll see the key settings (free version):
- Linking type — External File saves your code as a real file on your server; Internal embeds it dynamically via the WordPress API.
- Linking type — External File saves your code as a real file on your server; Internal embeds it dynamically via the WordPress API.
- Where on page — choose whether the code loads in the
<head>or the<footer>. Scripts that don’t need to run immediately usually belong in the footer for better performance. - Where on page — choose whether the code loads in the
<head>or the<footer>. Scripts that don’t need to run immediately usually belong in the footer for better performance. - Where on site — Frontend for your public site, Admin for the dashboard, or Login Page for customizing the login screen.
- Where on site — Frontend for your public site, Admin for the dashboard, or Login Page for customizing the login screen.
Click Publish when you’re done.
Step 3: Clear your cache
If your site uses a caching plugin or your host has server-side caching, clear it now — otherwise visitors may keep seeing the old version of your site.
If your site uses a caching plugin or your host has server-side caching, clear it now — otherwise visitors may keep seeing the old version of your site.
A note on the alternatives
- Customizer → Additional CSS works fine for small CSS tweaks, but it only handles CSS and offers no organization for larger changes.
- Customizer → Additional CSS works fine for small CSS tweaks, but it only handles CSS and offers no organization for larger changes.
- A child theme is the best home for code that’s part of your site’s design and should survive theme switches conceptually — see our child theme tutorial.
- A child theme is the best home for code that’s part of your site’s design and should survive theme switches conceptually — see our child theme tutorial.
- For code that does things (rather than just styling), consider packaging it as a small plugin — our plugin development basics guide walks through it.
- For code that does things (rather than just styling), consider packaging it as a small plugin — our plugin development basics guide walks through it.
Whichever method you choose, keep custom code organized and documented. Six months from now, a snippet titled “test final v2” helps no one.
Whichever method you choose, keep custom code organized and documented. Six months from now, a snippet titled “test final v2” helps no one.