Every serious website needs a way for visitors to get in touch — for questions, quotes, feedback, or business inquiries. A contact form is how you offer that without pasting your personal email address all over the internet.
The good news: you don’t need to write a single line of code. A free form plugin handles the form builder, the email notifications, and the spam protection. This guide walks you through the whole thing in about 15 minutes.
Quick answer: To create a contact form in WordPress: (1) install the free WPForms Lite plugin, (2) create a form from the Simple Contact Form template, (3) customize the fields, (4) set your notification email and confirmation message, (5) embed the form on your Contact page with the WPForms block, (6) turn on spam protection, and (7) submit a test message to make sure it works.
Why a contact form beats a plain email address
It’s tempting to just write “email me at hello@example.com” on your Contact page. A form is better for four reasons:
- Less spam. Bots harvest
mailto:addresses from web pages automatically. A form keeps your address hidden. - Better messages. You decide which fields are required (name, email, topic), so you stop getting one-line “hi” emails with no context.
- More professional. A clean form looks like a real business; a bare email link looks like a placeholder.
- Organized inbox. Every message arrives with the same structure and a clear subject line, which makes them easier to answer — and some plugins store every submission in your dashboard as a backup.
Which contact form plugin should you use?
There are dozens of form plugins. For a simple contact form, four free options cover 95% of beginners. Here’s the honest comparison:
| WPForms Lite | Contact Form 7 | Forminator | Ninja Forms | |
|---|---|---|---|---|
| Cost | Free (paid plans from $49.50/yr) | 100% free, no paid tier | Free (Pro via WPMU DEV membership) | Free core + paid add-ons |
| Builder | Drag-and-drop with live preview | Text/markup editor, no visual builder | Drag-and-drop (click-to-add fields) | Drag-and-drop |
| Free templates | 20+ | None | 6 presets | A few |
| Stores entries (free) | No — submissions go to email only | No (needs the separate Flamingo plugin) | Yes, in your dashboard | Limited |
| Conditional logic (free) | No (paid plans) | No | Yes | Paid add-on |
| Spam protection | Honeypot, reCAPTCHA, hCaptcha, Cloudflare Turnstile | reCAPTCHA integration | Honeypot, reCAPTCHA, hCaptcha, Turnstile | Honeypot, reCAPTCHA |
| Active installs | 5M+ | — | 600,000+ | — |
| Best for | Beginners who want the easiest builder | Minimalists comfortable with markup | Maximum free features | Flexible free starting point |
My recommendation for this guide: WPForms Lite. It’s the friendliest builder for a first-timer — 5 million+ active installs, a 4.8/5 rating from 13,500+ WordPress.org reviews (as of October 2026), and a genuine drag-and-drop interface with ready-made templates. The free version covers everything a basic contact form needs.
Two honest caveats: WPForms Lite does not store submissions in your dashboard (entries arrive by email only — entry storage starts on paid plans), and the first-year prices are 50%-off intros (Basic is $49.50/year the first year, then renews at $99; Pro is $199.50, then $399). If in-dashboard entry storage and conditional logic matter to you on a $0 budget, Forminator gives you both free — the steps below are nearly identical there.
Step 1: Install WPForms Lite
In your WordPress dashboard, go to Plugins → Add New and search for “WPForms”. Look for “WPForms – Contact Form, Payment Form & Custom Form Builder” by WPForms, then click Install Now and Activate.
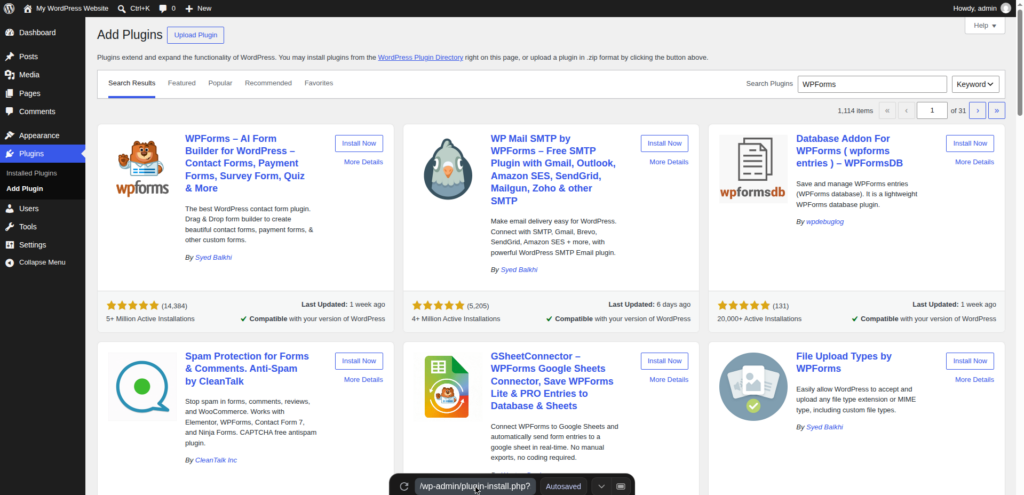
Once activated, you’ll see a new WPForms menu item in your dashboard sidebar. (If you see a welcome/setup wizard, you can safely skip it — we’re building the form manually so you learn how it works.)
Step 2: Create your form from a template
Go to WPForms → Add New. Give your form a name — “Contact Form” is fine — then choose the Simple Contact Form template.
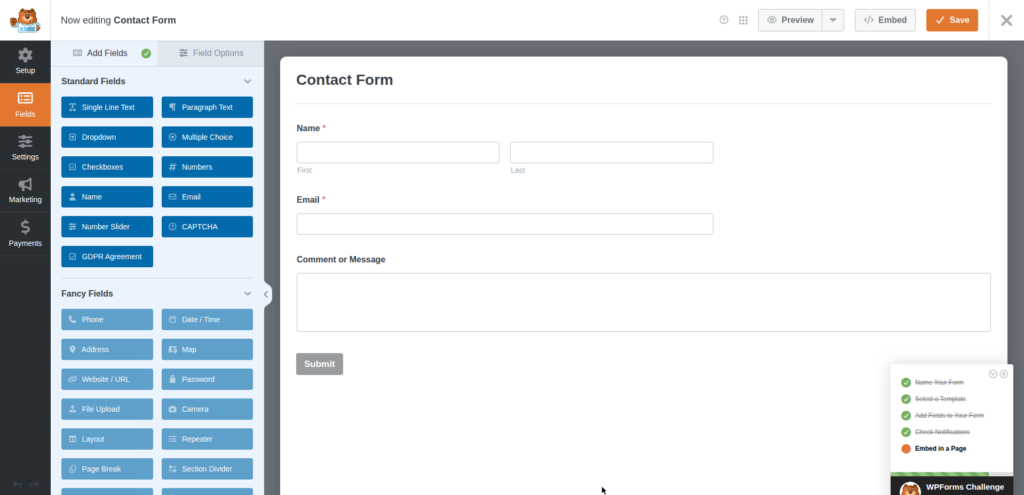
The template comes pre-loaded with the three fields every contact form needs: Name, Email, and Comment or Message. Starting from a template instead of a blank form saves you five minutes of setup.
Step 3: Customize the fields
Click any field to edit it in the left panel — you can change its label, mark it as required, or adjust its size. To add a field, drag it from the left panel onto the form. Useful additions for a contact form:
- Phone (optional — only ask if you’ll actually call people back)
- Dropdown (“What’s this about?” — Support, Sales, Press, Other) to route messages
- Checkboxes for a newsletter opt-in or a privacy-policy consent
Keep it short. Every extra field lowers the chance someone finishes the form. Name, Email, and Message convert best — add more only if you have a real use for the answers. Make sure Email is marked required (click the field and check “Required”), or you’ll get messages you can’t reply to.
Click Save in the top-right corner when you’re done.
Step 4: Set up email notifications and the confirmation message
Two settings decide what happens after someone hits Submit. Find them under Settings in the form builder sidebar.
Notifications (Settings → Notifications) control the email you receive:
- Send To Email Address — defaults to
{admin_email}, which is your site’s admin email. Change it if you want form mail going somewhere else (e.g.hello@yourdomain.com). - Email Subject — defaults to something like “New Entry: Contact Form”. Make it descriptive, e.g. “Website contact form submission”. You’ll thank yourself when searching your inbox later.
- From Email — use an address on your own domain if you have one; it improves deliverability (more on that in the troubleshooting section).
Confirmations (Settings → Confirmations) control what the visitor sees after submitting. You have three options: show a Message (“Thanks for contacting us! We will get back to you within 2 business days.”), Show Page (send them to a thank-you page), or Go to URL (redirect somewhere). A friendly confirmation message is enough for most sites — and it reassures visitors their message actually went through.
Click Save again.
Step 5: Add the form to your Contact page
Now put the form where visitors can find it. Go to Pages → Add New (or edit your existing Contact page), give it the title “Contact”, then click the + inserter, search for WPForms, and add the WPForms block. Choose your “Contact Form” from the dropdown — you’ll see a live preview right in the editor.
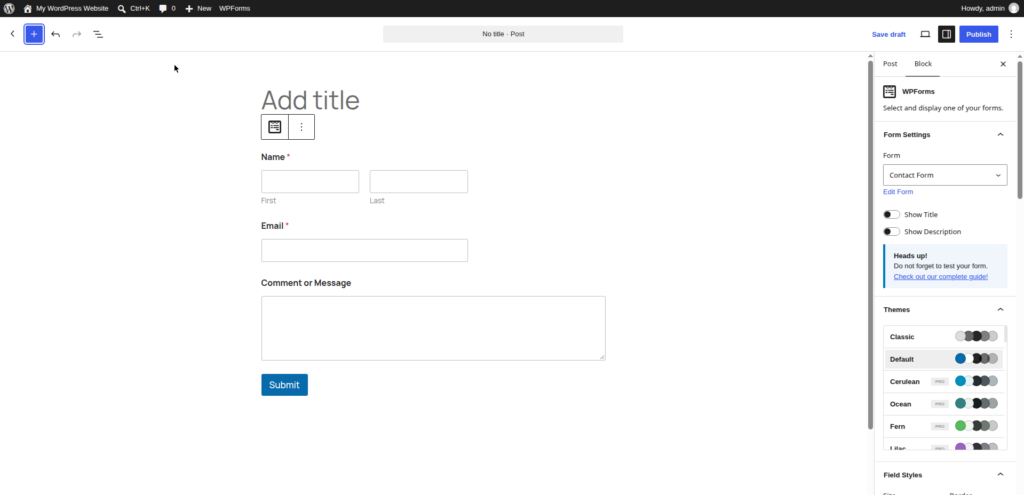
Publish (or Update) the page. If your theme doesn’t show a Contact link in the menu yet, go to Appearance → Menus and add the page there — a contact form nobody can find doesn’t get messages.
No block editor? WPForms also gives you a shortcode for every form (shown on the WPForms → All Forms screen). Paste it into any page, post, or text widget and the form renders there.
Step 6: Turn on spam protection
A public form attracts bots. WPForms gives you layered protection — turn on at least the first layer:
- Honeypot (on by default). WPForms → Settings → General → “Enable anti-spam protection”. This adds an invisible field humans never see; bots fill it in and get silently rejected. Leave it on — it costs you nothing.
- Cloudflare Turnstile (recommended). WPForms → Settings → CAPTCHA → Turnstile. It’s free, privacy-friendly, and unlike old CAPTCHAs it usually verifies visitors without making them click traffic lights. You’ll need free site/secret keys from Cloudflare (takes two minutes).
- reCAPTCHA or hCaptcha work the same way if you prefer them — same settings screen, just paste in the keys.
For a low-traffic site, the honeypot alone stops most junk. Add Turnstile the first week you notice spam slipping through.
Step 7: Test your form
Don’t skip this. Open your Contact page in a private/incognito window (so you’re testing as a visitor, not as the logged-in admin), fill in the form, and submit. Then check:
- Did the confirmation message appear?
- Did the notification email arrive in your inbox? Check the spam folder too — first-time form emails often land there.
- Does the message contain everything you asked for, formatted readably?
If the email doesn’t arrive at all, see the troubleshooting section below — it’s the most common contact-form problem in WordPress and it’s fixable in ten minutes.
Troubleshooting: form emails not arriving
This deserves its own section because it bites almost every beginner. WordPress sends email with PHP’s mail() function via wp_mail(), and many hosts either throttle it, block it, or let it through with no authentication — so Gmail, Outlook, and company inboxes file it as spam or reject it outright. Your form is working; the delivery is broken.
The fix is an SMTP plugin, which routes WordPress email through a real mail service instead of PHP mail:
- Install the free WP Mail SMTP plugin (Plugins → Add New, search “WP Mail SMTP”).
- Run its setup wizard and pick a mailer. Easiest options: your Gmail account (fine for low volume), or a transactional service like SendGrid or Brevo (free tiers cover thousands of emails/month — better for a growing site).
- Add the credentials or API key the wizard asks for, then use its built-in Email Test tool to send yourself a test message.
- Re-test your contact form. The notification should now arrive reliably.
If you send from an address on your own domain (e.g. hello@yourdomain.com), also add the SPF and DKIM records your mailer gives you to your domain’s DNS — most hosts document this in one help article, and it’s what stops your mail being flagged as forged.
Common mistakes to avoid
- Asking for too much. Name, Email, Message is the sweet spot. A 12-field “contact” form is a quote form wearing a disguise — and it converts like one.
- No spam protection. The honeypot is on by default; leave it on. Adding Turnstile takes minutes and saves hours of deleting junk.
- Notifications going to an inbox nobody checks. Point “Send To Email Address” at an address you actually read, and reply fast — contact-form leads go cold within hours.
- Never testing after changes. Theme update, plugin update, new caching setup — re-submit a test message. Forms break silently.
- A Contact page with no menu link. Add it under Appearance → Menus. Also link it in your footer.
- No privacy note. If you collect personal data (you do — names and emails), add one line under the form linking to your privacy policy. It’s good practice and required under GDPR if you have EU visitors.
Frequently asked questions
Do I really need a plugin for a contact form?
Technically you could code one, but there’s no good reason to. A plugin gives you a visual builder, email notifications, spam protection, and entry handling with zero code — and the best ones are free. Unless you’re a developer who enjoys maintaining form-handling code, use a plugin.
Is WPForms really free?
Yes — WPForms Lite is free forever on WordPress.org, and it’s a complete contact-form solution, not a trial. The paid plans add entry storage in the dashboard, conditional logic, payments, and integrations: Basic is $49.50/year for the first year (renews at $99), Plus $99.50 ($199), Pro $199.50 ($399), Elite $299.50 ($599). Most personal sites and small blogs never need to upgrade.
WPForms or Contact Form 7 — which is better for beginners?
WPForms, comfortably. Contact Form 7 is 100% free with no upsell and it’s rock-solid, but you build forms by editing markup tags in a text box — there’s no visual builder, no templates, and no entry storage without an extra plugin. If “free as in $0 forever and I don’t mind markup” is your priority, CF7 is excellent. If “easiest to build and maintain” wins, WPForms Lite.
Why am I getting spam through my contact form?
Because it’s public and bots found it. Enable the honeypot (on by default in WPForms) plus Cloudflare Turnstile or reCAPTCHA under WPForms → Settings → CAPTCHA. If spam persists, the free Akismet plugin filters form submissions too. And never publish the notification email address itself on the page — that’s a separate spam vector.
Can I add a contact form without any plugin?
You can, but each workaround has a catch: page builders like Elementor and Divi include form widgets (only if you already use them), and you can embed a third-party form like Google Forms or Jotform with an embed code (but the styling won’t match your site and the data lives elsewhere). For a WordPress site, a dedicated form plugin is the cleanest option.
Related guides
- 15 Essential WordPress Plugins Every New Site Needs (2026) — the contact form plugin earns its spot alongside backups, SEO, and security
- WordPress Website Maintenance Checklist — add “submit a test contact-form message” to your monthly routine so silent breakage never lasts long
- How to Secure Your WordPress Website: A Beginner’s Step-by-Step Guide (2026) — spam protection is one layer; here’s the full security stack